Ever since I got my hands on a Raspberry Pi, I’ve been meaning to do a real science oriented project with it. Not just a little project that you can have fun with for a while, but an actual practical and useful project. I tried Googling for any similar ideas online, but unfortunately, I didn’t really come across any. I tried thinking of ways I could use it in lab for quite a while, but I couldn’t really think of anything really practical. Until a few weeks ago!
Before I explain my idea, let me give you a little background about myself. I’m a PhD student working in the field of structural biology / biochemistry, and hence my days are filled with purifying proteins and doing research on them. If you’ve had any experience of working with proteins, you’ll know that proteins can’t be stored in water; they need to be stored in buffers. And not just any buffer, the pH of the buffer needs to be set at a particular value, which itself depends on the protein you’re working on. What’s more, that half a litre of buffer you carefully weighed up and made, can get used up really, really quickly! And if it doesn’t get used it up, it will surely get contaminated soon enough! Hence, the never ending cycle of making buffers.
Your experiences may vary depending on your pH meter in lab, but at least for me, adjusting the pH of the buffer is usually the longest and more tedious part. You have to add acid or base drop by drop to make sure you don’t overshoot, and in between each drop you need to wait for the pH meter to detect the change in pH. Long story short, it’s very cumbersome! So here I am, designing a concept that can adjust the pH for me automatically!
How’s it all going to work?
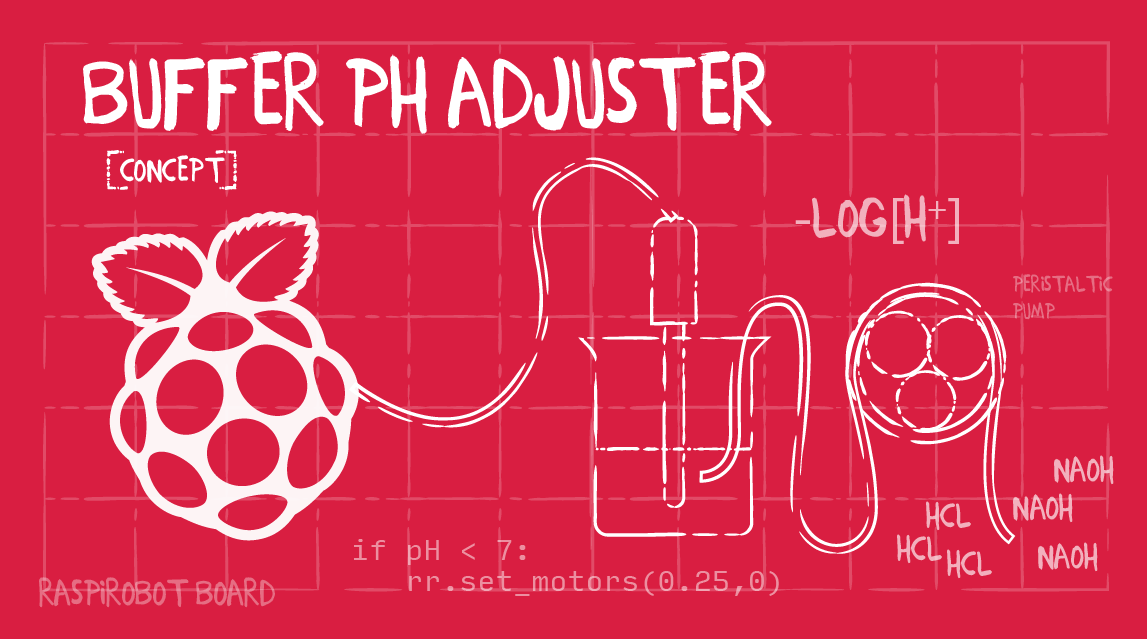
I should point out first, that this is a concept tutorial and I haven’t been able to physically try this out (due to lacking the pH meter kit). There’s two key parts to this project, a way to measure the pH of the solution, and a way to dispense acid or base into the buffer. To measure the pH of the solution is surprisingly easy! Atlas Scientific does an amazing pH probe kit that you can hook up to your Raspberry Pi. The kit comes with the probe to measure the pH, an I2C/UART pH circuit for reading values from the sensor and calibration solutions!
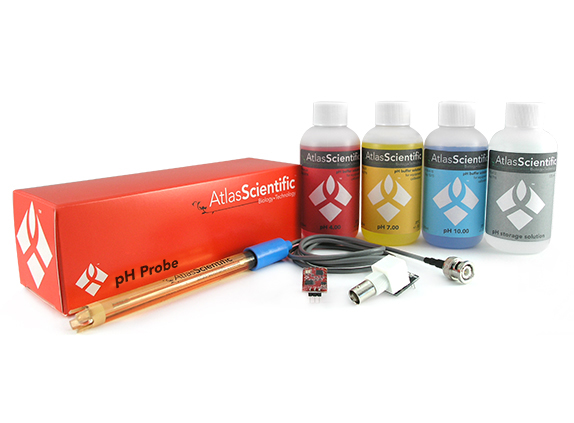
Atlas Scientific’s pH probe kit, complete with calibration solutions! image from http://atlas-scientific.com/product_pages/kits/ph-kit.html
The second important part to this project is the motor to dispense acid and alkali into the solution! This can be achieved rather easily using a peristaltic pump! You can actually find these on Amazon or eBay for less than £15. These same sort of pumps are used in science labs, as well as in aquaponics as a way for watering plants. The ones on Amazon / eBay are in fact made for the latter, and can apparently dispense liquid at very high flow rates (~40 mL/min). The smallest of such pumps contains a 6V DC motor, meaning you’ll need a special motor shield to control it.
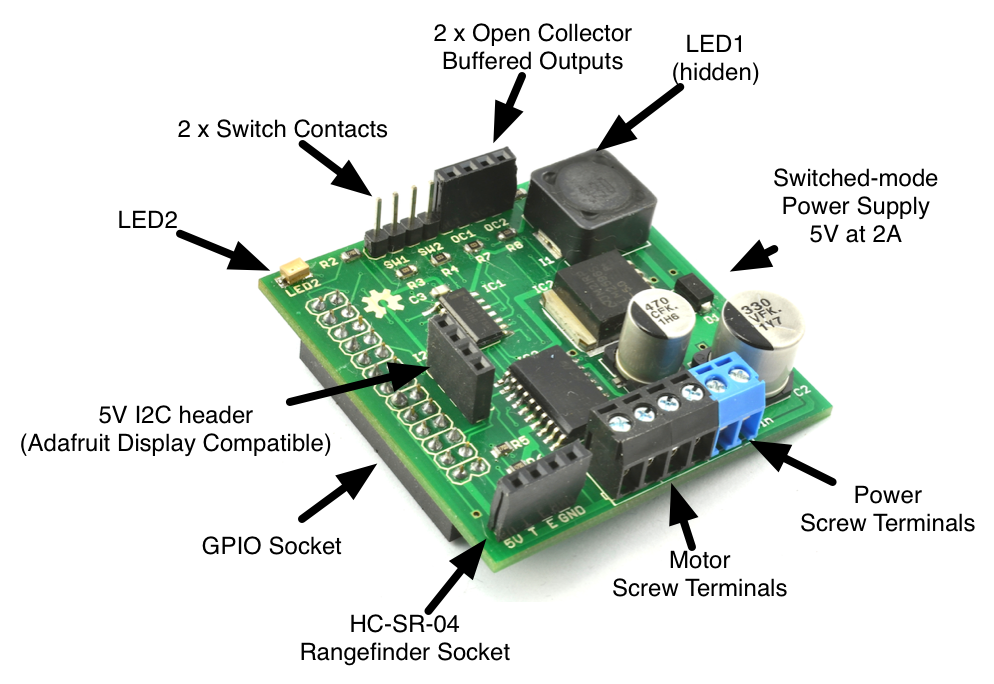
RaspiRobot board v2
Monk Makes does a fantastic robot shield called the RaspiRobot board v2 for the Raspberry Pi, for controlling such motors. What makes this shield especially great, is that it has on board connectors such as I2C sockets, and connectors for an ultrasonic distance module. You can even connect Adafruit’s LED matrices for making your project even more awesome! The shield is in fact for driving robots, but re-purposing components is what makes electronics so much fun, so why not?!
To sum it up, here’s how everything will work together: The pH probe will send readings to the Raspberry Pi at regular time intervals, and according to the set pH value, a peristaltic pump connected either to an acid or alkali solution, will be turned on and begin dispensing the liquid into our buffer or solution. For this to work for any scenario, we’d ideally need two pumps. However, as in practice you only use an acid or alkali to bring the pH to your desired value, you could make this work with just one pump. It’s generally a bad idea to add both acid and alkali to your buffer (the only scenario in which this would happen is if you overshoot past your pH), as during the neutralisation process, salt will be produced. As most buffers have tightly regulated salt concentrations, this is something you generally want to avoid!
What do we need?
- Raspberry Pi (any model should do)
- RaspiRobot Board v2
- (2x ideally) 6V dosing peristaltic pump
- Tubing to connect to peristaltic pump (also available from Amazon / eBay)
- 7-9V power supply (e.g. 7.4 V LiPo batteries or 6x AA batteries)
- pH probe and circuit (Atlas Scientific pH kit)
- Breadboard
- Jumper wires and electrical wires
For the power supply, 6x AA batteries are the best choice as they have a large capacity (~1,000 mAh) and are easy to get hold of. Maplin stores in the UK (a fantastic store for an electronics hobbyist, which I recently discovered!) are good place to find battery boxes for AA batteries, amongst others. On the other hand, you could nick a battery from a DSLR (assuming you have one), which happen to be 7.4 V LiPo batteries similar to ones used in RC cars. Nikon DSLR batteries in particular, are more suitable, as the terminal pins are accessible to jumper wires.
Wiring it all up!
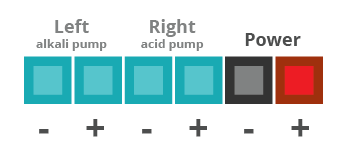
First things first, install the RaspiRobot board onto your Raspberry Pi. If you’ve got a Raspberry Pi model B+ or Pi 2, there are more pins on the GPIO header than required. The board should sit, so that it occupies the pins in the corner of the circuit, as opposed to those in the centre. Looking at the board from the bottom (with the power and motor screw terminals at the bottom), connect the negative terminal terminal to the left pin of the power pins pair, and the positive terminal to the right pin of the pair. Hence, from left to right it should be: -ve, +ve. The two motor pin pairs, have negative and positive terminals, but these don’t matter as much. Connecting them in the wrong order simply means the motor runs the wrong way, hence try both ways to see which works for your motor. Ensure you connect the left motor pair to the pump dispensing alkali solution, and the right pair to the pump dispensing acid solution.
The final wiring to do is, the EZO pH circuit. The wiring for this diagram is according to the guides provided by Atlas Scientific. Plug in the EZO pH circuit into the breadboard, across the middle vertical divider. Plug in the BNC connector (the circular plug hole for the pH probe) on the breadboard below the pins for VCC, PRB and PGND. The BNC connector should align with PRB and PGND pins. At the top of the EZO pH circuit, we’ll be using the TX and RX pins. Connect a wire from the TX pin on the pH circuit to the RX pin (pin #14) on the GPIO header of the RaspiRobot board; and a wire from the RX pin on the pH circuit to the TX pin (pin #15) on the GPIO header.

Required packages and items
Before we can run our code, we’ll need to install a couple of required packages. The first package we’ll need is PySerial, which you can install using the terminal command pip install pyserial. Once installed, you’ll need to configure it for use with pH circuit. Refer to this guide here to set it up.
You’ll also need to install Simon Monk’s ‘RaspiRobot board’ API, found on his GitHub page here. Follow the instructions on the page to install the Python library.
Assembling it
Assembly is easy! Apart from the wiring, you just need to connect the tubing to the peristaltic pump, and dip one end in the acid/alkali reservoir, and other into your buffer. You may want some sort of boxes or wireframes for mounting the pumps onto, but that’s optional. You’ll probably need to do a test run with water only, to see which way the pumps runs so you pump the acid/alkali into the buffer, and not the other way around.
Let’s start the project!
A little bit of calibration…
The code for this project is available from my GitHub page here! Download the code to a directory, and navigate using the terminal (either LXTerminal or similar, or via SSH) to the directory. Before you run the main code, I recommend that you calibrate the pH meter. You’ll need to do this for 3 solutions, pH 4, 7 and 10. To do this, type sudo python calibrate.py. The code will automatically begin calibrating for pH 4. Dip the pH probe in to the provided pH 4 calibration solution, and monitor the readings printed until they read a value stable(-ish) around 4.0. Once the value is stable, remove the probe from the solution and wash the probe with distilled water carefully, followed by drying it. Now you’re ready to calibrate at the next value, pH 7. Press Ctrl-C to start calibrating at the next value, and monitor until the pH is stable around 7.0 as before. Repeat finally once more for pH 10, and you’re done!
And the actual project…
To run the code, type sudo python ph-buffer.py at the terminal. You will then be prompted to enter the pH value which you would like to set the system at. Enter, as a number, and then press enter. Your Pi should begin reading the pH values, and dispensing acid or alkali accordingly!
Considerations and potential issues
- Depending on the peristaltic pump you get, you may run into issues getting it to work the first time around. This can usually be overcome by applying a good amount of lubricant inside the pump head. Most pumps can be opened by removing the screws.
- As it is quite likely the exact pH set will not be achieved down to precision of the pH probe, the system may continue trying to adjust the pH indefinitely until you stop it. Keep an eye on the pH value, and stop the code by pressing `Ctrl-C` when you’ve reached the desired pH.
I hope you’ve enjoyed this tutorial, and hopefully somebody can get to actually try it out! As mentioned earlier, I don’t have access to the pH kit, so I can’t try out the entire project. If any of you do have the pH kit on hand, please do give this a try and let me know how it works out! And of course, drop a comment if you encounter any problems and I will happily help you out!
Comments
-
Nick B.
-
Chris
-
Ismail Uddin
-
-
Michael Zuraw
-
Ismail Uddin
-
Michael Zuraw
-
Ismail Uddin
-
Michael Zuraw
-
Ismail Uddin
-
Michael Zuraw
-
Ismail Uddin
-
-
-
-
Michael Zuraw
-
-
Juan
-
Timothy Campolo
-
Ismail Uddin
-
Garrett Bundy
-
-
-
Sebastian Stankiewicz
-
Ismail Uddin
-
Sebastian Stankiewicz
-
Ismail Uddin
-
-
-