
Monk Makes, makers of the popular starter kit for the Raspberry Pi, has recently released some new kits for the Raspberry Pi, one of which is the new Servo kit we’ll be taking a look at today. There’s also a simple project to get you started with this new kit!
With the arrival of the new Monk Makes’ Raspberry Pi kits comes their new redesigned branding and packaging, alongside their familiar easy to use code libraries.
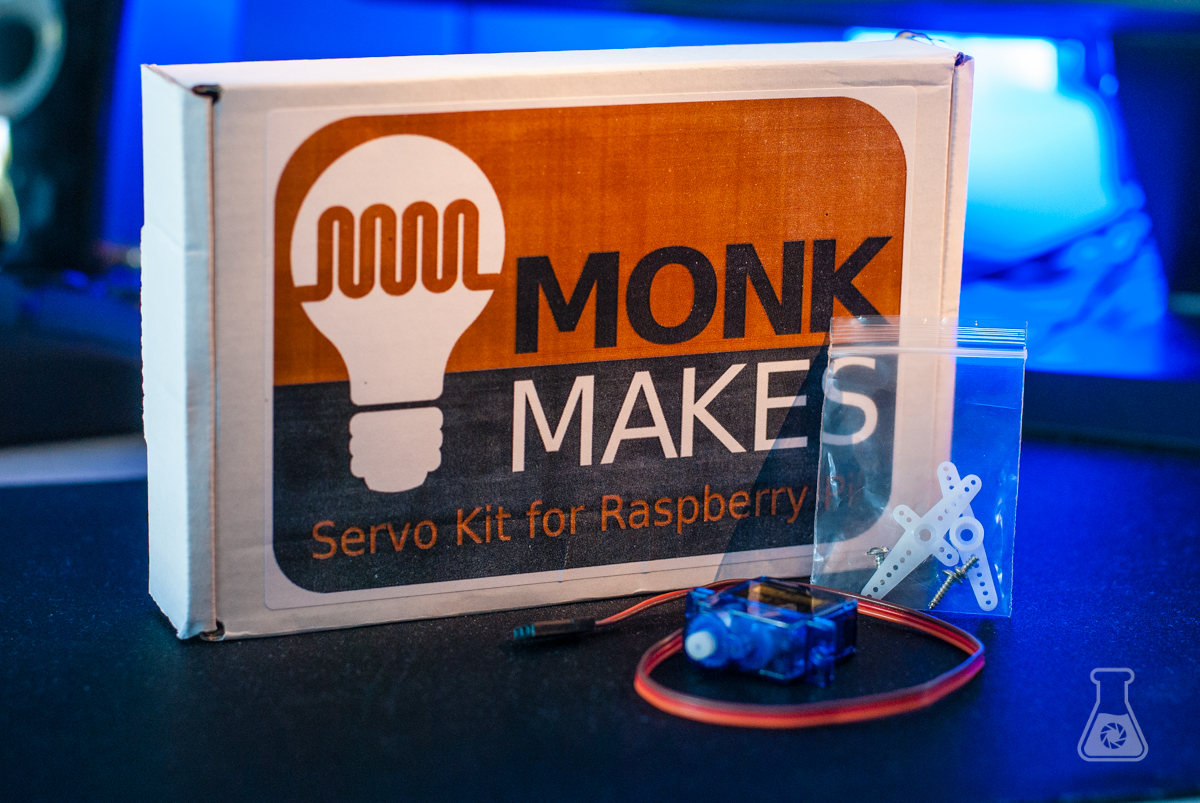
The Servo Kit is amongst their more simpler kits, which includes two micro 9 g servo motors, the Servo Six interface board, and a 4x AA battery box (alongside servo handles, screws, some jumper wires and a Raspberry Pi GPIO leaf). These sort of kits in particular, are a great starting point for makers, as they provide the basic building blocks for your project, allowing you to be as creative as possible. That’s not say that kits which are designed for a particular project aren’t as good, as you can just as well re-purpose their components in your own project.
Servos are a great component for any maker interested in getting involved in robotics projects. Unlike ordinary motors, they allow you to precisely control the orientation of the gear, allowing for some really creative projects. If you’re struggling to imagine how you could use a servo in your project, here are some particularly great projects we came across:
The provided servos in the box come with some add-ons such as single horns, dual horns and four way horns, as well as screws to mount the servo. The horns also have holes within them, allowing you to connect them to other parts.
The best part of the Monk Makes Servo Kit is their brilliantly simple servosix library, which provides simple easy to use commands to control the servos orientation. This library is built upon richarghist’s ServoBlaster library, which is slightly trickier to use.
Powering the servos requires a separate power supply of 6 V, which is provided through the supplied 4x AA battery box. However, if you’re only using a few servos or low power ones, you could get away with using a USB cable, plugged into a powered USB hub. To extract the power terminals of a USB you would need to snip the cable, or if you have a FTDI /console cable lying around, you could just borrow the power terminals from that cable.
Raspberry Pi based thermometer gauge using a servo
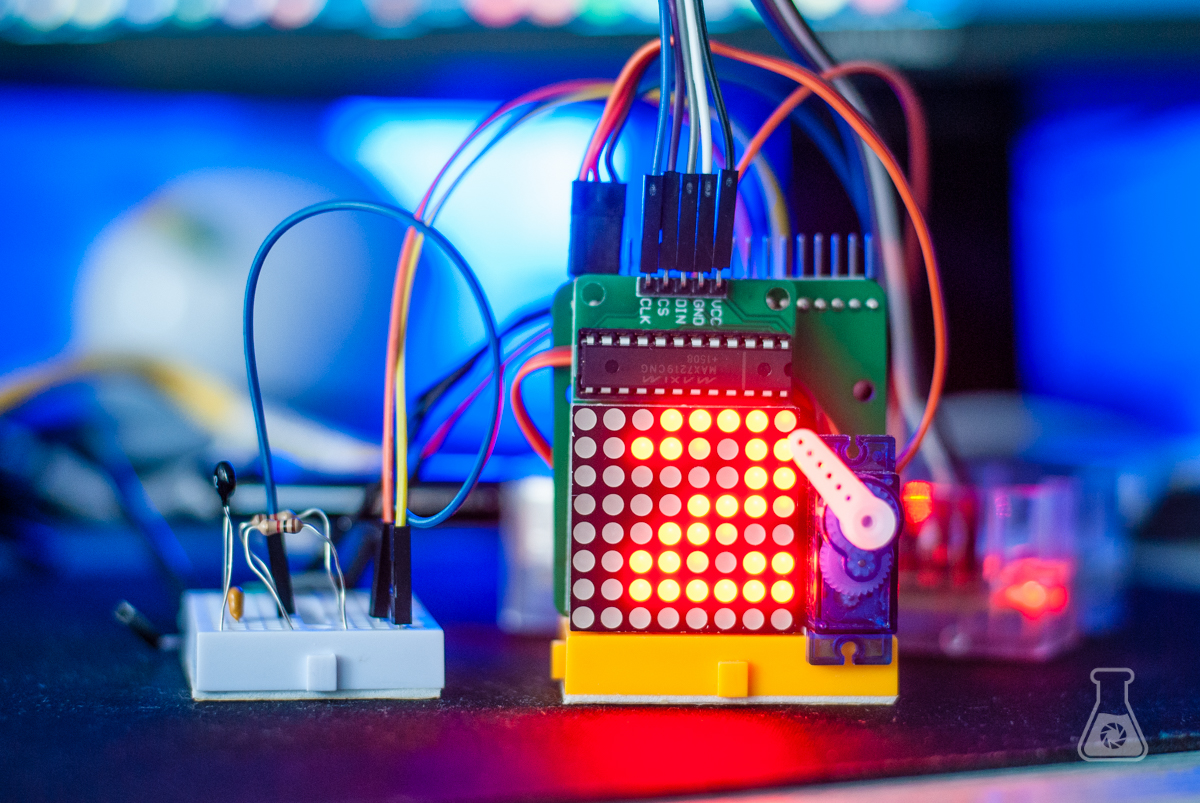
The precision control of the servo gear’s angle opens up some interesting possibilities for project ideas. One such idea is for a thermometer gauge. To make temperature measurements, we’ll be using the step method on a capacitor / thermistor circuit. This idea is very nicely explored in Simon Monk’s Raspberry Pi Cookbook, and all the components and circuit diagrams are provided in Monk Makes’ Raspberry Pi Starter Kit . To spruce up the project a little bit, we’ll also throw in an LED matrix to read out the measurements.
What do you need?
- Raspberry Pi B+ (or newer); essentially any Pi with the longer GPIO header
- MAX7219 LED matrix
- 330 nF capacitor
- Thermistor
- 2x 1 kΩ resistors
- Jumper wires
- Monk Makes Servo Kit
Wiring
The wiring for this project is a bit complicated, as there’s many components involved. So we’ve split it into two parts. The first part is the thermistor circuit and LED matrix shown below:
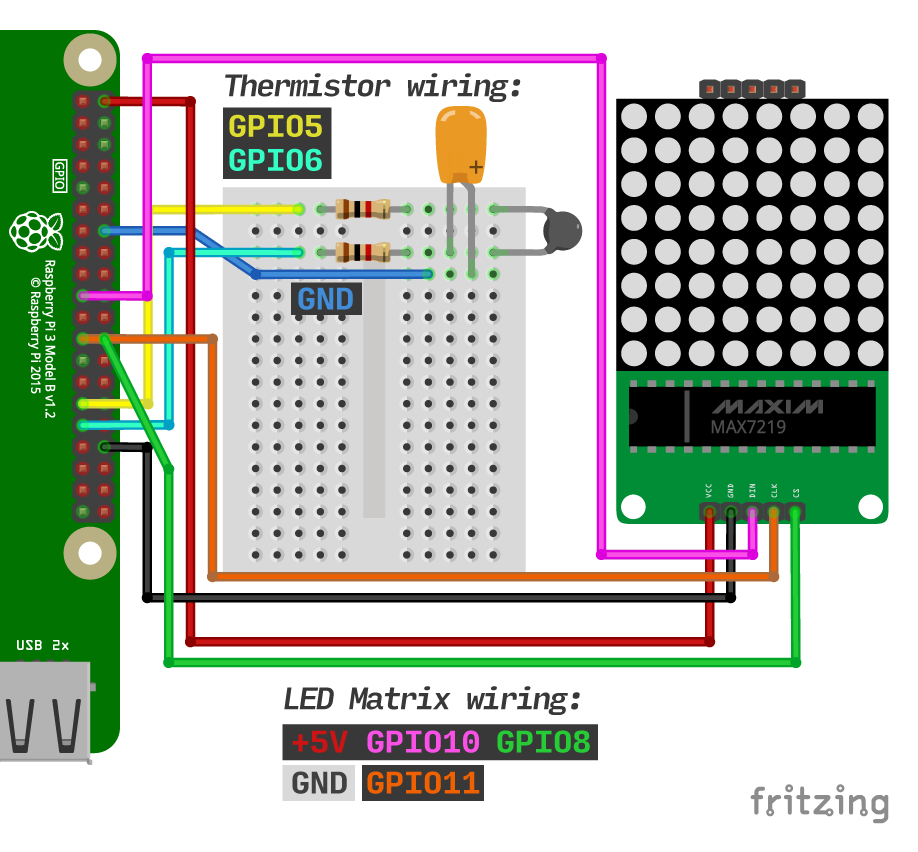
Finally, for the ServoSix board and servo, simply connect the GND pin on the board to any available ground pin on the Pi and the pin for servo 1 to GPIO17 on the RPi. Since we’re only using one servo, we only need the one pin. The servo can then be attached onto the ServoSix board using the ribbon cable. Align the end of the pin head with the orange wire to the C pin of the servo pin header on the ServoSix board (connect the servo to the set numbered 1). Refer to the GitHub page here for a diagram of the wiring. There’s a lot of components to plug into the breadboard, which we’ve managed to squeeze most onto one board (except for the thermistor circuit).
Plugging in the ServoSix board into the bread board was the more challenging part, as the bottom end of the board has pin holes for the power terminals, which gets pushed against the top surface of the breadboard, preventing any access to them. To solve this issue, we simply snapped some pins from a pin header, and put them into the pin holes. These pins then fit snuggly into the breadboard, allowing us to use male jumper wires to get access to the power terminals from the breadboard!
The code
The code for this project can be downloaded as always from our GitHub page raspberrypirepository. To download the folder for this particular project, run the following commands from your terminal of choice:
$ sudo apt-get install subversion
$ svn export https://github.com/ismailuddin/raspberrypi/trunk/servo-temp servo-temp
$ cd servo-temp
$ sudo python main.py
What do you get?
You should now see the temperature printed to the LED matrix, and the servo acting as a gauge for the temperature. To make the change in servo angle more perceptible, we’ve scaled the gauge to work across 15° to 45°C. You can change these values yourself inside the temp.py script, on line 10 where the variables min_temp and max_temp are declared.
Hopefully you enjoyed this fun and simple project to get you started using a servo with a Raspberry Pi. Be sure to pick up your kit from Monk Makes on Amazon!